CHANGE: Beginning in late 1985, the dimensions of the pump rotor and pump slide changed (See Figure 1).
REASON: Improved pump capacity.
PARTS AFFECTED
(1) PUMP ROTOR - The outside diameter of the rotor was made smaller. The previous rotor O.D. was 2.235", and the present rotor O.D. is 2.210". (See Figure 1).
(2) PUMP SLIDE - The height of the pump slide stop was made shorter. The previous pump slide stop measures .426", and the present pump slide stop measures .406" (See Figure 1).
INTERCHANGEABILITY:
The pump rotor and pump slide are interchangeable. "ONLY AS A SET". You CANNOT mix these parts.
(1) If you install the previous (Large) rotor with the present (Short) slide, interference will result and usually strip the rotor splines.
(2) If you install the present (Small) rotor with the previous (Tall) slide, erratic line pressures can be encountered.
(3) DO NOT MIX THESE PARTS.
Also recommend some car tools like digimaster 2
and Launch X431
which may help to konw auto repair.
SERVICE INFORMATION:
Tuesday, April 2, 2013
Friday, March 29, 2013
THM 4L60-E - Intermittent Pressure Rise On 1996 Models Only
COMPLAINT: Beginning at the start of production for all 1996 model vehicles equipped with the THM 4L60-E transmission, there was a VCM (Vehicle Control Module) installed on the vehicles with an internal ground wire that connects the two printed circuit boards together. Some vehicles with the VCM will display very erratic and unstable line pressure rise in the transmission, and in some instances, premature failure of the transmission.
CAUSE: Bad ground connection from one printed circuit board to the other.
CORRECTION: There is now available from OEM parts sources, a new service repair kit with an instruction sheet, to repair 1996 vehicles with this condition, and is available under OEM part number 12167310.
Step Number One:
Remove the wire and terminal from location 18 in the "Clear" connector, and install one end of the jumper wire that is included in the service kit into location 18 in the "Clear" connector, and reinstall the clear connector, as shown in Figure 1.
Step Number Two:
Install the wire and terminal that was removed from cavity location 18 in the clear connector, into empty cavity location 23 of the "Blue" connector, as shown in Figure 1.
Step Number Three:
Install the other end of the included jumper wire that was previously installed in cavity 18 of the clear connector, into empty cavity location 26 of the "Red" connector, as shown in Figure 1.
SERVICE INFORMATION:
Service Repair Kit......................................................12167310
You can find soem car tools like launch crecorder and Maxiscan Ms509 which can help you more.
CAUSE: Bad ground connection from one printed circuit board to the other.
CORRECTION: There is now available from OEM parts sources, a new service repair kit with an instruction sheet, to repair 1996 vehicles with this condition, and is available under OEM part number 12167310.
Step Number One:
Remove the wire and terminal from location 18 in the "Clear" connector, and install one end of the jumper wire that is included in the service kit into location 18 in the "Clear" connector, and reinstall the clear connector, as shown in Figure 1.
Step Number Two:
Install the wire and terminal that was removed from cavity location 18 in the clear connector, into empty cavity location 23 of the "Blue" connector, as shown in Figure 1.
Step Number Three:
Install the other end of the included jumper wire that was previously installed in cavity 18 of the clear connector, into empty cavity location 26 of the "Red" connector, as shown in Figure 1.
SERVICE INFORMATION:
Service Repair Kit......................................................12167310
You can find soem car tools like launch crecorder and Maxiscan Ms509 which can help you more.
Tuesday, March 26, 2013
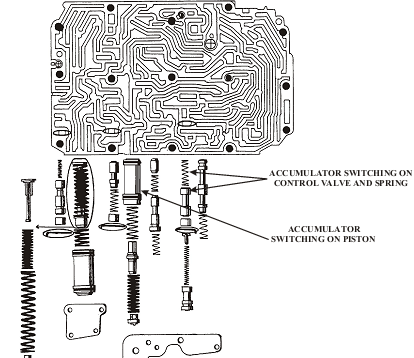
MERCEDES 722.3 - 722.4 - Slipping And/Or No Reverse
COMPLAINT: Before and/or after rebuild, any Mercedes equipped with the 722.3 - 722.4 transmission may exhibit a chattering in reverse, slipping in reverse, or no reverse.
CAUSE: The cause may be, a stuck or sticking Accumulator Switching On Control Valve, a collapsed or broken Accumulator Switching On Control Valve Spring, a missing, cut, or leaking seal ring on the accumulator piston, or a cracked Accumulator Switching On Piston (See Figure 1).
CORRECTION: Remove and disassemble the valve body. Inspect and replace as necessary, the parts and concerns listed above, as shown in Figure 1.
CAUSE: The cause may be, a stuck or sticking Accumulator Switching On Control Valve, a collapsed or broken Accumulator Switching On Control Valve Spring, a missing, cut, or leaking seal ring on the accumulator piston, or a cracked Accumulator Switching On Piston (See Figure 1).
CORRECTION: Remove and disassemble the valve body. Inspect and replace as necessary, the parts and concerns listed above, as shown in Figure 1.
Friday, March 22, 2013
MAZDA/FORD GF4A-EL/GF4EAT HARSH UPSHIFTS
COMPLAINT: 1993 & up, vehicles equipped with GF4A-EL transaxles, may exhibit a harsh 1-2 upshift or harsh upshift complaints when "hot", before or after overhaul. More car diagnostic tool
to konw? Line pressure appears to be normal or slightly higher than normal 60-70 psi. at idle and 161-172 psi. at stall when checking in the "D" range when the vehicle is "cold." Although when the vehicle gets "hot" the pressures get irratic and or exceed the stall pressure specs, which are 175 psi. in "D" and 300 psi. in "Reverse."
CAUSE: The cause may be, a faulty Pressure Control Solenoid, a worn Boost Valve and Sleeve and/or a worn Pressure Regulator Valve bore which is part of the Rear Control Valve Body.
CORRECTION: Replace the Pressure Control Solenoid as shown in Figure 1, with Ford part number F32Z-7G136-AA or Mazda part number FU9A-21-1G1A. Inspect the Pressure Regulator Valve and the Pressure Regulator Valve bore for wear or scoring as shown in Figure 2. If the bore has "shiny" spots where the Valve rides a "New" Rear Control Valve Body can be purchased from Mazda. Inspect the Boost Valve and Boost Valve Sleeve for wear or scoring, and replace as needed with Sonnax boost valve and sleeve as shown in Figure 2.
SERVICE INFORMATION:
Pressure Control Solenoid (Ford Part No.)..............................................F32Z-7G136-AA
Pressure Control Solenoid (Mazda Part No.).............................................FU9A-21-1G1A
Rear Control Valve Body (Mazda Part No.)................................................FU9C-21-115G
NOTE: This is a new casting with no valves in it.
Boost Valve and Sleeve (Sonnax Part No.)........................................................74846-01K
Hot car tools such as u581 scanner and vag km immo tool are sure to help you more about auto repair.
CAUSE: The cause may be, a faulty Pressure Control Solenoid, a worn Boost Valve and Sleeve and/or a worn Pressure Regulator Valve bore which is part of the Rear Control Valve Body.
CORRECTION: Replace the Pressure Control Solenoid as shown in Figure 1, with Ford part number F32Z-7G136-AA or Mazda part number FU9A-21-1G1A. Inspect the Pressure Regulator Valve and the Pressure Regulator Valve bore for wear or scoring as shown in Figure 2. If the bore has "shiny" spots where the Valve rides a "New" Rear Control Valve Body can be purchased from Mazda. Inspect the Boost Valve and Boost Valve Sleeve for wear or scoring, and replace as needed with Sonnax boost valve and sleeve as shown in Figure 2.
SERVICE INFORMATION:
Pressure Control Solenoid (Ford Part No.)..............................................F32Z-7G136-AA
Pressure Control Solenoid (Mazda Part No.).............................................FU9A-21-1G1A
Rear Control Valve Body (Mazda Part No.)................................................FU9C-21-115G
NOTE: This is a new casting with no valves in it.
Boost Valve and Sleeve (Sonnax Part No.)........................................................74846-01K
Hot car tools such as u581 scanner and vag km immo tool are sure to help you more about auto repair.
FORD E40D - NO UPSHIFT, COMPUTER COMMANDS OK
COMPLAINT: Some 1996 and later Ford Motor Company vehicles that are equipped with the E4OD Transmission, before or after overhaul may exhibit a no upshift condition with the shift selector in Drive.
CAUSE: After determining that the PCM is commanding the transmission to make the upshifts, the cause may be that the BS2 Checkball, located in the Main Valve Body is missing. See Figure 1.
CORRECTION: Install the ¼ in. Green Rubber Checkball in the location as shown in Figure 1.
SERVICE INFORMATION:
Green ¼ in. Checkball..................................................................................F6TZ-7E195BB
Of course, you can get more informations about auto repair from some car tools like Creader V and launch crecorder from vtoolshop.
CAUSE: After determining that the PCM is commanding the transmission to make the upshifts, the cause may be that the BS2 Checkball, located in the Main Valve Body is missing. See Figure 1.
CORRECTION: Install the ¼ in. Green Rubber Checkball in the location as shown in Figure 1.
SERVICE INFORMATION:
Green ¼ in. Checkball..................................................................................F6TZ-7E195BB
Of course, you can get more informations about auto repair from some car tools like Creader V and launch crecorder from vtoolshop.
Tuesday, March 19, 2013
FORD AX4S/AX4N - Tcc Solenoid Change And Shift Solenoid Interchange
(UPDATED INFORMATION)
CHANGE: At the start of production for the 1997 model year, the Lincoln Continental equipped with the AX4N transaxle, received a new design and higher resistance, Modulated Lock-Up Solenoid. Know more obd2 scanner?
At the start of production for the 1998 model year, the Taurus and Sable equipped with the AX4S transaxle, also received this new design Modulated Lock-Up Solenoid (MLUS).
REASON: Much improved converter clutch application and durability.
PARTS AFFECTED:
(1) MODULATED LOCK-UP SOLENOID - The new design MLUS is round, like the previous design solenoid, but has a blue connector instead of the previous white, and a resistance value of 13-24 Ohms, instead of the previous 0.98-1.6 Ohms resistance (See Figure 1).
INTERCHANGEABILITY:
The O.E. Manufacturer first advised not to interchange the solenoids, but has since backed off of that statement, as the only MLUS now available is the new design with the blue connector and higher resistance. ATSG has seen no problems with installing the new design MLUS on the previous model transaxles, except 1991 Taurus and Sable which are non-modulated models. Use the chart in Figure 2 to check the resistance of the MLUS through the case connector to determine which solenoid is in the transaxle.
SPECIAL NOTE:
Shift Solenoids - Shift Solenoids for the AX4S transaxle and AX4N transaxle are identical in every dimension and every respect except one. Shift Solenoids for the AX4S have a diode in the solenoid, and Shift Solenoids for the AX4N do not have a diode in the solenoid, as the vehicles equipped with the AX4N have the diodes in the processor.Some car tools such as OPEL EDC16 KM Tool and BMW and BENZ Scanner are helpful to you.
This means that the AX4S Shift Solenoids can be used in AX4N transaxles, but AX4N Shift Solenoids cannot be used in AX4S transaxles, as there would be no diode protection. Most suppliers stock only the AX4S shift solenoid, as it works well on both.
SERVICE INFORMATION:
Modulated TCC Solenoid with Blue Connector.............................................. F7OZ-7G136-AA
Modulated TCC Solenoid with White Connector............................................ F3DZ-7G136-AA
AX4S Transaxle Shift Solenoids ..................................................................... F1DZ-7G484-A
AX4N Transaxle Shift Solenoids .................................................................... F3DZ-7G484-AA
CHANGE: At the start of production for the 1997 model year, the Lincoln Continental equipped with the AX4N transaxle, received a new design and higher resistance, Modulated Lock-Up Solenoid. Know more obd2 scanner?
At the start of production for the 1998 model year, the Taurus and Sable equipped with the AX4S transaxle, also received this new design Modulated Lock-Up Solenoid (MLUS).
REASON: Much improved converter clutch application and durability.
PARTS AFFECTED:
(1) MODULATED LOCK-UP SOLENOID - The new design MLUS is round, like the previous design solenoid, but has a blue connector instead of the previous white, and a resistance value of 13-24 Ohms, instead of the previous 0.98-1.6 Ohms resistance (See Figure 1).
INTERCHANGEABILITY:
The O.E. Manufacturer first advised not to interchange the solenoids, but has since backed off of that statement, as the only MLUS now available is the new design with the blue connector and higher resistance. ATSG has seen no problems with installing the new design MLUS on the previous model transaxles, except 1991 Taurus and Sable which are non-modulated models. Use the chart in Figure 2 to check the resistance of the MLUS through the case connector to determine which solenoid is in the transaxle.
SPECIAL NOTE:
Shift Solenoids - Shift Solenoids for the AX4S transaxle and AX4N transaxle are identical in every dimension and every respect except one. Shift Solenoids for the AX4S have a diode in the solenoid, and Shift Solenoids for the AX4N do not have a diode in the solenoid, as the vehicles equipped with the AX4N have the diodes in the processor.Some car tools such as OPEL EDC16 KM Tool and BMW and BENZ Scanner are helpful to you.
This means that the AX4S Shift Solenoids can be used in AX4N transaxles, but AX4N Shift Solenoids cannot be used in AX4S transaxles, as there would be no diode protection. Most suppliers stock only the AX4S shift solenoid, as it works well on both.
SERVICE INFORMATION:
Modulated TCC Solenoid with Blue Connector.............................................. F7OZ-7G136-AA
Modulated TCC Solenoid with White Connector............................................ F3DZ-7G136-AA
AX4S Transaxle Shift Solenoids ..................................................................... F1DZ-7G484-A
AX4N Transaxle Shift Solenoids .................................................................... F3DZ-7G484-AA
Friday, March 15, 2013
FORD 4R100 - "NON-PTO" AND "PTO" HYDRAULIC DIFFERENCES
CHANGE: Begining at the start of production for 1999 models, Ford Motor Company made available a "Power Take Off" option for some F250, F350, F450 and F550 Super Duty Trucks, equipped with 5.4L, 6.8L and 7.3L engines. More daignostic tool?
REASON: The "PTO" option addition, to the 4R100, required many changes to the transmission to make the "PTO" function. The "PTO" window, added to the case, the "PTO" drive gear and other cosmetic changes were previously covered in ATSG Bulletin No. 98-56. Hydraulic changes also had to be made to make the coast clutch operate in ranges other than the Drive ranges.
PARTS AFFECTED:
(1)TRANSMISSION CASE: The transmission case was changed to acommodate the "PTO" window, as shown in ATSG Bulletin No. 98-56. All 4R100 Cases, "NON-PTO"and "PTO,"also had a "Dam" added to seperate "Rear Lube" and to incorperate "Central Lube".
VALVE BODY TO CASE SPACER PLATE: The Valve Body to Case Spacer plate on the "PTO" versions had a hole added to supply the 3-4 Shift Valve with Line Pressure. A hole was also added to the Spacer Plate on "NON-PTO" and "PTO" versions to connect "Solenoid Regulator Valve" oil to supply "Central Lubrication."
(3)MAIN VALVE BODY: A passage was added on the "Upper Side" of the Main Valve Body on "PTO" versions, as shown in Figure 5, to supply Line Pressure to the 3-4 Shift Valve. A passage was also added, on the "Lower Side" of the Main Valve Body, to connect the 3-4 Shift Valve (Coast Clutch Circuit) to an exhaust.The spring side of the 3-4 Shift Valve was also seperated from the Low/Reverse circuit.
(4)LOWER VALVE BODY: The Lower Valve Body had a passage added, to connect to the "new"exhaust passage in the Main Valve Body.
(5)LOWER VALVE BODY SPACER PLATE: The Lower Valve Body Spacer Plate had a hole added to connect the "new" exhaust passage in the Main Valve Body to the "new" exhaust passage in the Lower Valve body.
INTERCHANGEABILITY:
None of the parts listed above will interchange between "NON-PTO" and "PTO" versions.
SERVICE INFORMATION:
Valve Body To Case Spacer Plate (Non-PTO) .................. ................................F81Z-7A008-DA
Valve Body To Case Spacer Plate (PTO) ...........................................................F81Z-7A008-BA
Recommend some car tools like Renault key programmer and mitsubishi mut 3 from vtoolshop for you to get more useful information.
REASON: The "PTO" option addition, to the 4R100, required many changes to the transmission to make the "PTO" function. The "PTO" window, added to the case, the "PTO" drive gear and other cosmetic changes were previously covered in ATSG Bulletin No. 98-56. Hydraulic changes also had to be made to make the coast clutch operate in ranges other than the Drive ranges.
PARTS AFFECTED:
(1)TRANSMISSION CASE: The transmission case was changed to acommodate the "PTO" window, as shown in ATSG Bulletin No. 98-56. All 4R100 Cases, "NON-PTO"and "PTO,"also had a "Dam" added to seperate "Rear Lube" and to incorperate "Central Lube".
VALVE BODY TO CASE SPACER PLATE: The Valve Body to Case Spacer plate on the "PTO" versions had a hole added to supply the 3-4 Shift Valve with Line Pressure. A hole was also added to the Spacer Plate on "NON-PTO" and "PTO" versions to connect "Solenoid Regulator Valve" oil to supply "Central Lubrication."
(3)MAIN VALVE BODY: A passage was added on the "Upper Side" of the Main Valve Body on "PTO" versions, as shown in Figure 5, to supply Line Pressure to the 3-4 Shift Valve. A passage was also added, on the "Lower Side" of the Main Valve Body, to connect the 3-4 Shift Valve (Coast Clutch Circuit) to an exhaust.The spring side of the 3-4 Shift Valve was also seperated from the Low/Reverse circuit.
(4)LOWER VALVE BODY: The Lower Valve Body had a passage added, to connect to the "new"exhaust passage in the Main Valve Body.
(5)LOWER VALVE BODY SPACER PLATE: The Lower Valve Body Spacer Plate had a hole added to connect the "new" exhaust passage in the Main Valve Body to the "new" exhaust passage in the Lower Valve body.
INTERCHANGEABILITY:
None of the parts listed above will interchange between "NON-PTO" and "PTO" versions.
SERVICE INFORMATION:
Valve Body To Case Spacer Plate (Non-PTO) .................. ................................F81Z-7A008-DA
Valve Body To Case Spacer Plate (PTO) ...........................................................F81Z-7A008-BA
Recommend some car tools like Renault key programmer and mitsubishi mut 3 from vtoolshop for you to get more useful information.
Subscribe to:
Posts (Atom)